A good summer favorite or year round favorite of ours! I always loved my mom's BBQ ribs which were fall of the bone delicious! The smell as they cooked was mouth watering and the taste was to die for. Of course I may be over exaggerating some, but I do know that when my mom makes her ribs with her own BBQ rub, they quickly disappear at the dinner table. Now I am fortunate enough to have the recipe handed down to me :)
~~
Ingredients
1 rack baby back ribs
Dijon Mustard
Your favorite BBQ rub (or my mom's)
Fruit juice or Beer
Ingredients for my mom's rub
1/3 cup sugar
1 Tbsp kosher salt
1 Tsp black pepper
1 tsp granulated garlic or garlic powder
1/2 Tsp cinnamon
2 Tbsp smoked paprika
cayenne pepper or chilli flakes (for spice) <---optional
~~
Assebly
Place ribs in a foil-lined baking dish with sides, you may have to cut the rack into two or three pieces to fit. Coat the ribs with a very thin layer of mustard on both sides. Sprinkle with rub and pat in. let sit for 1/2 hour while preheating your oven to 350 degrees. Add 2/3 cup fruit juice (or beer) along sides of ribs in pan. DO NOT add to top of rub. Cover tightly with foil and bake in center rack of oven for 1 hour. Remove from oven and take off top foil and cool for 10 mins. Drain off all the liquid and fat, then spoon on your favorite BBQ sauce over top. Place under the broiler until caramelized (about 5-7 minutes). Make sure to watch carefully so that the ribs don't burn. When finished cooking cut ribs into pieces and enjoy!
~~
Final Thoughts
This is directly from my mom, who was always better at being short and to the point. Serve this with a side of salad or some fresh fruit and they make a meal of themselves! Also if you have any left over meat, you can peel it off the bone, pull it apart and make a nice BBQ pork sandwich for the next day! Hope you enjoy, happy eats! :)
August 23, 2014


January 21, 2014
Chicken Quesadillas
As you can tell from a lot of my dishes, I have a thing for chicken! My mom has always been a fan of chicken so it's what I'm used to cooking. My dad has never been a big chicken fan, but even he can't pass up some good Mexican food. My boyfriend, who is a picky eater, even enjoys this recipe! He often times will request that I make my chicken quesadillas for dinner! Quick finger food that will fill you up and leave you wanting more! The nice thing is that you can mix, match, and personalize your quesadillas your way, but here is my basic chicken recipe.
~~
Ingredients
Breast Tenderloins (I generally buy 1-2 packs of them depending on how many quesadillas I'm looking to make. Generally 1 pack will get me about 8-10 quesadillas)
3/4 Onion (diced)
3/4 Bell Pepper (diced)
Jalepenos (optional)
Shredded cheese (I generally use either a mexican blend or a cheddar)
1 pack of tortillas (I use the burrito size but you can use whatever size you'd like)
1 pack of fajita mix
Assembly
Dice the boneless tenderloins into cube size about 1" or less and then use most of the pack of the fajita mix to coat the diced chicken. Keep some of the fajita mix to season the veggies. I generally just mix the chicken in a ziploc bag. Spread the seasoned chicken cubes onto a cookie sheet or a glass pan and place in the oven. Broil on high until the meat is cooked through. Take meat out and set aside. In a medium frying pan sautee bell pepper and onion adding the remaining fajita mix for some flavor. You may also add your jalepenos for a little spice at this point. Add the meat to the mixture and cook for another 2-3 mins or until everything is well incorporated.
To make the fajitas you can do it one of two ways. You can heat up a skillet and cook the fajitas one at a time, or you can make a cookie sheet full and bake them.
Cooked in Skillet: spray the skillet with some cooking spray and place on stovetop at medium heat. Lay a tortilla flat on the skillet and add a layer of the meat mixture to half the tortilla, then top with the cheese. Fold over the tortilla to make the quesadilla and cook until browned on one side. Carefully flip the quesadilla over and cook the other side until browned. Set the cooked quesadilla aside to cool down then cut into 3 sections or keep whole if you desire.
Cooked in Oven: Preheat oven to 350 degrees. Spray a cookie sheet and assemble your quesadillas until the sheet is full (i generally get about 6-8 on a large sheet). Spray the top with cooking spray and place in oven for 15-20 minutes or until golden brown. Remove from oven and cool then cut into 3 sections if desired.
Serve on a platter or in a bowl and enjoy!
Final Thoughts
I generally get a small saucer of ranch sauce to dip in, but you can use salsa or anything else you'd like. Add a dollop of sour cream on top and serve with a salad, or if you cut it into 3 slices you have a nice finger food! Get creative and make your own quesadillas. I actually adapted this recipe from a simple cheese quesadilla I would make for my mom and dad. I've even used beef! So let your imagination go wild with this. If you're REALLY feeling quesadilla dinner you can also add my dessert queasilla for a sweet after dinner dish! Happy eating!
~~
Ingredients
Breast Tenderloins (I generally buy 1-2 packs of them depending on how many quesadillas I'm looking to make. Generally 1 pack will get me about 8-10 quesadillas)
3/4 Onion (diced)
3/4 Bell Pepper (diced)
Jalepenos (optional)
Shredded cheese (I generally use either a mexican blend or a cheddar)
1 pack of tortillas (I use the burrito size but you can use whatever size you'd like)
1 pack of fajita mix
Assembly
Dice the boneless tenderloins into cube size about 1" or less and then use most of the pack of the fajita mix to coat the diced chicken. Keep some of the fajita mix to season the veggies. I generally just mix the chicken in a ziploc bag. Spread the seasoned chicken cubes onto a cookie sheet or a glass pan and place in the oven. Broil on high until the meat is cooked through. Take meat out and set aside. In a medium frying pan sautee bell pepper and onion adding the remaining fajita mix for some flavor. You may also add your jalepenos for a little spice at this point. Add the meat to the mixture and cook for another 2-3 mins or until everything is well incorporated.
To make the fajitas you can do it one of two ways. You can heat up a skillet and cook the fajitas one at a time, or you can make a cookie sheet full and bake them.
Cooked in Skillet: spray the skillet with some cooking spray and place on stovetop at medium heat. Lay a tortilla flat on the skillet and add a layer of the meat mixture to half the tortilla, then top with the cheese. Fold over the tortilla to make the quesadilla and cook until browned on one side. Carefully flip the quesadilla over and cook the other side until browned. Set the cooked quesadilla aside to cool down then cut into 3 sections or keep whole if you desire.
Cooked in Oven: Preheat oven to 350 degrees. Spray a cookie sheet and assemble your quesadillas until the sheet is full (i generally get about 6-8 on a large sheet). Spray the top with cooking spray and place in oven for 15-20 minutes or until golden brown. Remove from oven and cool then cut into 3 sections if desired.
Serve on a platter or in a bowl and enjoy!
Final Thoughts
I generally get a small saucer of ranch sauce to dip in, but you can use salsa or anything else you'd like. Add a dollop of sour cream on top and serve with a salad, or if you cut it into 3 slices you have a nice finger food! Get creative and make your own quesadillas. I actually adapted this recipe from a simple cheese quesadilla I would make for my mom and dad. I've even used beef! So let your imagination go wild with this. If you're REALLY feeling quesadilla dinner you can also add my dessert queasilla for a sweet after dinner dish! Happy eating!
Chicken Pot Pie
Alright, I admit that I have been very slacking! No new recipes in QUITE a while. Guess life is catching up to me! Hope with all this crazy winter weather everyone stays nice and toasty warm! One thing is for sure if you have the ingredients for this recipe on hand, it makes for a nice, warm, comfort food meal on a cold day!
~~
Ingredients
2 chicken breasts **you can also use left over chicken or a rotisserie chicken
2 medium potatoes
1 small onion
2 fresh carrots (or you can use baby carrots) diced
3/4 cup peas
1 can chicken broth
1 can cream of chicken soup
seasoning (herbs, salt, pepper...I generally just use a basic chicken herb mix)
1 box pie crust
Assembly
Start by preheating your oven to about 350 degrees, remember that oven temperatures may vary. Cook the 2 chicken breasts in the oven for about 30 minutes. When finished let the chicken cool, remove the skin and bones, and cube the meat. If you're in a hurry, like I often am, you can also use a small rotisserie chicken and just chunk up the meat. While you wait for your meat to cook peel your potatoes and dice into 3/4 inch pieces. Put your diced potatoes and carrots into a saucepan with the can of chicken broth and bring to a boil. Simmer the vegetables until tender (about 10-12 minutes) then drain.
In a large bowl combine the diced meat, vegetables, peas, cream of chicken soup, and herbs until well mixed together. When the mixture is complete fill your pie pans with the filling and top with the pie crust. Seal the edges and cut slits to allow the steam to rise, then bake in the oven until the crust is light brown (about 20-30 minutes). Let it cool a bit and then enjoy!
Final Thoughts
May seem like a lot but it's a nice quick meal. You can also put a pie crust lining on the bottom of the pie pans to seal the goodness inside. As an extra treat if you get the mini pie pans you can make individual servings and freeze the leftovers! That's my mom's favorite way to make it! Simple homemade goodness in a convenient size! Don't forget to experiment! Happy eats!
~~
Ingredients
2 chicken breasts **you can also use left over chicken or a rotisserie chicken
2 medium potatoes
1 small onion
2 fresh carrots (or you can use baby carrots) diced
3/4 cup peas
1 can chicken broth
1 can cream of chicken soup
seasoning (herbs, salt, pepper...I generally just use a basic chicken herb mix)
1 box pie crust
Assembly
Start by preheating your oven to about 350 degrees, remember that oven temperatures may vary. Cook the 2 chicken breasts in the oven for about 30 minutes. When finished let the chicken cool, remove the skin and bones, and cube the meat. If you're in a hurry, like I often am, you can also use a small rotisserie chicken and just chunk up the meat. While you wait for your meat to cook peel your potatoes and dice into 3/4 inch pieces. Put your diced potatoes and carrots into a saucepan with the can of chicken broth and bring to a boil. Simmer the vegetables until tender (about 10-12 minutes) then drain.
In a large bowl combine the diced meat, vegetables, peas, cream of chicken soup, and herbs until well mixed together. When the mixture is complete fill your pie pans with the filling and top with the pie crust. Seal the edges and cut slits to allow the steam to rise, then bake in the oven until the crust is light brown (about 20-30 minutes). Let it cool a bit and then enjoy!
Final Thoughts
May seem like a lot but it's a nice quick meal. You can also put a pie crust lining on the bottom of the pie pans to seal the goodness inside. As an extra treat if you get the mini pie pans you can make individual servings and freeze the leftovers! That's my mom's favorite way to make it! Simple homemade goodness in a convenient size! Don't forget to experiment! Happy eats!
October 12, 2012
Meatloaf for the Soul

So with the coming of fall weather I'm seeking new recipes that I grew up with! On my way home from work today I had my usual call to talk to my parents on the long ride. Watching the fall leaves in the mountains and the cooling weather I've just had a craving for warm, filling, foods. One that came to mind right away...my mom's meatloaf! Not only did she make it the 'loaf' way, but I always loved her 'individual' sized meatloafs for on the go! May sound strange, but my mom's meatloaf...there was just somethign about it on a nice fall day! It was a quick, simple meal that filled me up right quick! So of course I had to get the recipe from her so I could pick up the ingredients for dinner tonight! So here it is, my mom's meatloaf!
~~
Ingredients
1 package ground turkey
1 egg
1/2 onion (finely diced)
breadcrumbs (handfull)
worcestershire sauce (few shakes)
salt/pepper (for taste)
ketchup
bbq sauce (opt)
minced garlic (opt)
bacon (one strip for individual loaf or enough to cover top)
Assembly
Preheat oven to 350-375 degrees (depending on your oven). Cover cookie sheet with piece of aluminum foil and set aside. In a medium sized bowl combine ground turkey, onion, egg, breadcrumbs, worcestershire sauce, salt/pepper, garlic, and few squirts of ketchup and bbq sauce. I mixed this together with my bare hands (make sure to wash hands!!). When well mixed shape your meatloaf on the cookie sheet! You can make one large loaf or (my fav way) individual loafs (1 package ground turkey makes about 5 individual loafs). After loafs are formed top each with a covering of ketchup and then finish with a strip of bacon crossed on top! Pop in the oven for about 35-40 mins and enjoy.
Final Thoughts
As you can see i coupled my meatloaf with some green beans (and the blank spot is for my potato which is still cooking haha). A great meal that's quick and simple and delicious! Experiment and enjoy! Happy eats!
January 22, 2012
Homemade Mac N Cheese
Who doesn't like the classic taste of Mac n Cheese? Brings back childhood memories for me! Plus you can soup this up any which way you want. Here I'll give you a simple recipe for a run of the mill mac n cheese. Once more I tend to come up with these recipes with whatever I happen to have on hand. This time I found myself wanting to cook something quick after a VERY long work day! With my mom gone (since I am currently back home for a stent) I had to fend for myself! Poor me, right? haha. Well, I decided for a simple, quick meal of mac n cheese. So here's what I did!
December 28, 2011
cookie dough truffles

In may many wanderings of the web, I happened to stumble upon this quite delicious recipe one day for cookie dough truffles! I added it to my favorites to look at later, and just never got back to it. Well, since it was the holiday season and I wanted something new to try out this year, I figured...WHY NOT! Who doesn't love cookie dough and chocolate?! I know I do!! here is the link to the original recipe I used: cookie dough truffle recipe. The author had mentioned about ruining the chocolate, which i almost did, but I will tell you a trick my mom taught me! : ) Mine don't look as pretty as the picture on the link, but they still turned out! so here we go! (p.s....THEY TASTE AMAZING)
December 14, 2011
Leftover Medley
Well...doesn't sound appetizing but really this recipe can be whatever you make it! I hope that people who happen to read my blog will share with me their own left over medley creations for others to try! The school year for me is winding down and that means that I will soon be embarking on a new journey in my life path. This means another change as I am packing up my stuff and moving from good ol Pittsburgh back to Ohio! Within the next year I hope to again be moving to my own place with a steady job, but we'll keep posted on that! :)
Well one thing I've always grown up on is the concept of leftovers! I'm sure other people have done the same. If not dinner/lunch leftovers its the hassle of 'oh my gosh I'm moving or going to be gone and NEED to get rid of some fresh food before then!' It's a shame to waste fresh food! My mom has always been great at throwing together bits and pieces of fresh things left in the fridge that just aren't enough to make a good full meal by themselves. Well, I learn from the best it seems!
Well one thing I've always grown up on is the concept of leftovers! I'm sure other people have done the same. If not dinner/lunch leftovers its the hassle of 'oh my gosh I'm moving or going to be gone and NEED to get rid of some fresh food before then!' It's a shame to waste fresh food! My mom has always been great at throwing together bits and pieces of fresh things left in the fridge that just aren't enough to make a good full meal by themselves. Well, I learn from the best it seems!
November 10, 2011
Homemade Pizza Pie
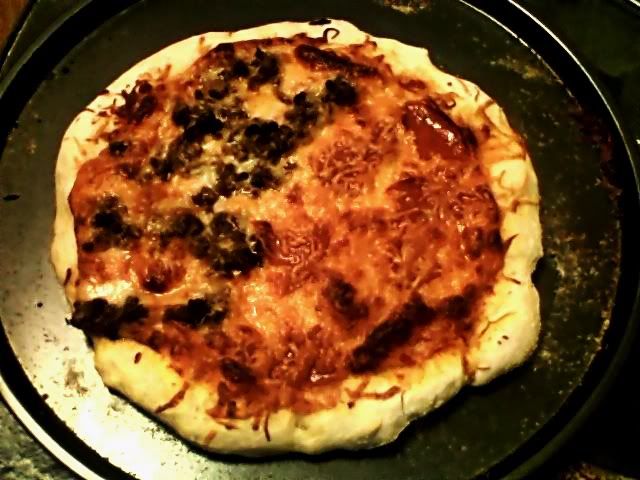
Who doesn't love a good pizza now and then? I know I do!! My mom and I have made homemade pizza together a few times now, and it's always a fun family experience! Plus you can individualize each one just the way you want! At home we have a pizza stone we make our pizza on, but I lack that here so I improvised and used a pizza sheet. I also cut the recipe in half since I was cooking just for me. Here is a simple recipe for pizza dough :) the dough recipe is courtesy of Emeril Lagasse http://www.foodnetwork.com/recipes/emeril-lagasse/basic-pizza-dough-recipe2/index.html
Subscribe to:
Posts (Atom)